In the world of Windows, RoboCopy (Robust File Copy) is a powerful and reliable command-line tool for backing up and synchronizing files. However, its command-line nature can be intimidating for many users. This is where RoboCopy All In One GUI comes in.
Developed by Gianpaolo Aggiusti, this free and intuitive tool provides a user-friendly graphical interface for RoboCopy, unlocking its full potential for everyone, from beginners to experts. This guide will walk you through every feature of the application, showing you how to streamline your backup, synchronization, and data transfer tasks with ease and confidence.
1. Installation? No, Thank You! (It’s Portable)
One of the best features of RoboCopy All In One GUI is its portability. There’s no complex installation process.
- Requirements: All you need is Windows 7 or higher. RoboCopy itself is already built into Windows, so you don’t need to install it separately.
- Setup: Simply download the .exe file, place it in any folder you like, and double-click to run it. That’s it!
2. Getting Started: Your First Copy
The main window is designed for clarity. Let’s create a basic backup.
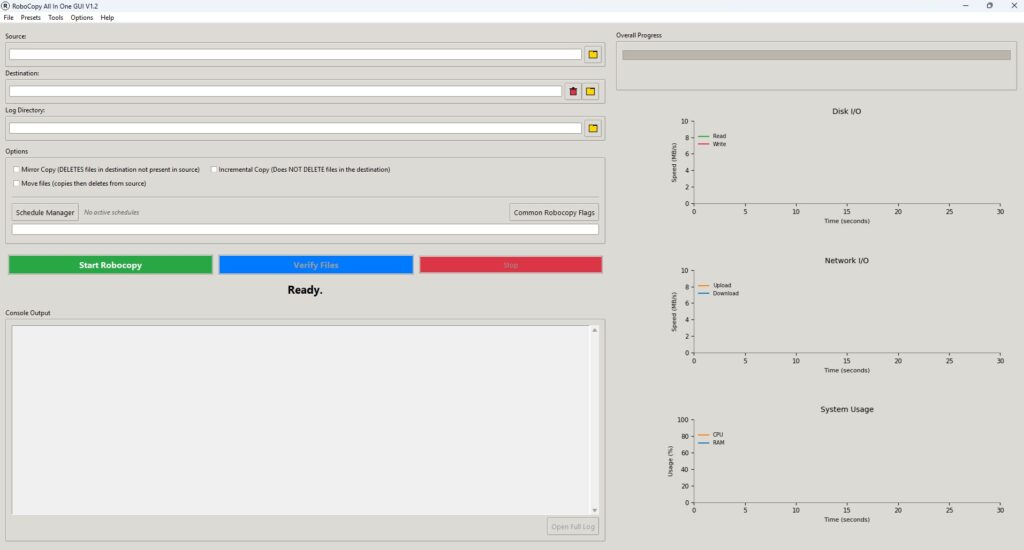
- Set Source and Destination:
- Source: Click the folder icon next to the “Source” field to select the folder containing the files you want to copy (e.g., C:\MyDocuments).
- Destination: Click the folder icon next to the “Destination” field to choose where the backup should be stored (e.g., D:\Backups).
- Choose a Copy Mode: The “Options” section offers three main presets for common tasks:
- Mirror Copy (
/MIR): This creates an exact replica of your source folder in the destination. Caution: If a file is deleted from the source, it will also be deleted from the destination during the next mirror copy. This is perfect for keeping a synchronized backup. - Incremental Copy: This mode copies only new or modified files from the source to the destination. It never deletes files from the destination, making it ideal for creating an archive of all versions of your files.
- Move files (
/MOVE): This functions like a “cut and paste.” Files are copied to the destination and then deleted from the source.
- Mirror Copy (
- Start the Copy: Once you’ve selected your mode, the “Manual Options” field will be automatically populated with the correct RoboCopy commands. Click the green “Start Robocopy” button and watch it work!
3. Real-Time Monitoring: See Your System in Action
While a copy is in progress, you don’t have to guess what’s happening. The right side of the window features three real-time performance graphs that give you a clear view of your system’s activity:
- Disk I/O: Monitors the read and write speeds of your hard drives.
- Network I/O: Shows your network upload and download speeds, which is crucial when backing up to or from a network location.
- System Usage: Displays your current CPU and RAM usage.
Thanks to recent optimizations, these graphs are incredibly fluid and use minimal CPU, providing a professional-grade monitoring experience without slowing down your system.
4. After the Copy: Summary and Verification
Once the process is complete, RoboCopy All In One GUI provides powerful tools to understand what happened and verify the integrity of your data.
- Copy Summary: A popup window appears showing detailed statistics of the operation: how many files were copied, skipped, or failed. It even includes a pie chart for a quick visual breakdown. The total duration of the copy is also conveniently displayed.
- Intelligent Post-Copy Verification: For ultimate peace of mind, you can use the “Verify Files” button. This feature calculates the SHA256 hash of every single file in the source and compares it with the corresponding file in the destination. This guarantees that your copied files are bit-for-bit identical to the originals. The verification runs in a separate window, showing its progress, disk read speed, and a detailed log of any mismatched or corrupted files.
5. Automation and Power User Features
This is where the tool truly shines, saving you time and giving you complete control.
Preset and Job Management
- Saving and Loading Jobs: Have a complex backup configuration you run regularly? You can save your current source, destination, and options as a
.rjobfile from the File > Save Job menu. Later, you can load it instantly. - Preset Manager: The Presets menu allows you to save just your favorite sets of RoboCopy options. For example, if you have a specific combination of include/exclude flags you use often, save it as a preset for one-click access.
Scheduling Your Backups
You can fully automate your backups using the Schedule Manager, accessible from the Tools menu.
- Set up your desired copy job in the main window (source, destination, options).
- Open the Schedule Manager and click “Add…”.
- Give your schedule a name, choose the time of day and the days of the week it should run.
- The tool will automatically execute the job at the scheduled times. A bug was fixed to ensure that if you modify the time of a schedule, it will run at the new time on the same day without issue.
For the Experts: Unleash Full Power
If the standard options aren’t enough, you can enable
“Expert Mode” from the Options menu. This unlocks the “All Robocopy Parameters” window, a comprehensive list of every single command and flag available in RoboCopy, neatly organized into categories. Each option is accompanied by a clear description. This window even resizes automatically to ensure all text is visible, making it easy to explore and use advanced features.
6. Destination Folder Management
Before starting a large backup, you might want a clean slate. The “Empty Destination” feature provides a secure way to do this.
- Secure Deletion: Clicking the trash can icon next to the destination path allows you to permanently delete all files and subfolders within the destination directory.
- Safety First: To prevent accidental data loss, the tool requires you to type the word
DELETEinto a confirmation box. - Progress Monitoring: A dedicated progress window appears during the deletion process, so you know exactly what’s happening.
Conclusion
RoboCopy All In One GUI V1.2 transforms a daunting command-line utility into a user-friendly and powerful backup solution. Its blend of simplicity for basic tasks and deep customizability for advanced scenarios makes it an essential tool for any Windows user. Whether you’re setting up a simple nightly backup for your documents or managing complex, multi-threaded data migrations, this application gives you the control and feedback you need to do it with confidence.
Virus free tested.
[download id=’548′]